When we talk about surveying and Scan to BIM, we tend to talk about a series of steps that we implement in order to get an accurate representation of the existing conditions on a particular construction project.
When it comes to defining what Scan to BIM actually is, then we tend to look towards The B1M’s definition which is “The process of 3D laser scanning a physical space or site to create an accurate digital representation of it. This representation can then be used for designing, assessing progress or evaluating options.”
So, to break this down even more, if there is an existing building in place on the site and there is a construction project planned to renovate it, refurbish it, or reconstruct it while keeping the established structure in place, then it is really important that we get an accurate and detailed representation of the existing conditions of the building.
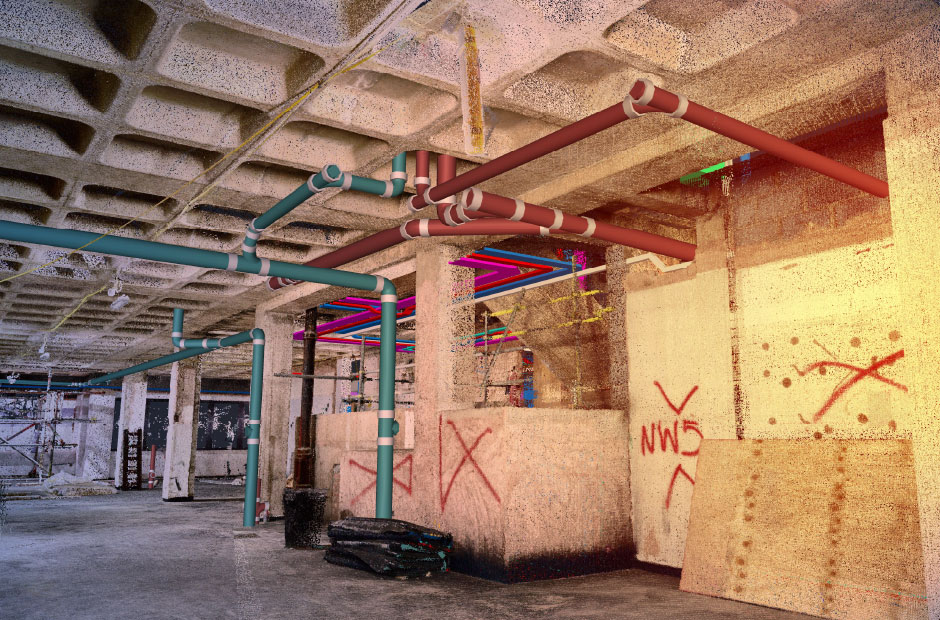
To do this, we use a 3D laser scanning device to capture the existing structure as a series of “points”. Millions of these points are then combined in such a way that it formulates a Point Cloud Scan. This scan is then imported into our 3D modelling platform so that we can use it to create an “as-built” model.
The Scan to BIM process has various uses including:
- Site verification
- Design validation, including planning and comparison
- Development of “as-built” drawings
- Interference checks
- MEP or construction elements definition
- Documentation of existing building conditions
- Quantity take-off
- Budget estimation
The Point Cloud to BIM Process
As you can imagine, the execution of a Scan to BIM project can be a challenge to implement, but our years of experience have taught us that it boils down to four key steps:
Step One: Capture
In this first phase of the Scan to BIM project, we gather as much information as we can about the project from the client and the field. The actual capturing of the information takes place in two phases:
Phase one: Pre-Mobilization Considerations take into account all of the information regarding scanner selection and pre-planning of site work before we arrive at the site.
Phase two: On-Site Information. It is really important to confirm the site conditions as part of the Scan to BIM project. Capturing the existing conditions of the building is completed by placing the scanner on a tripod so that it can capture the building with precision and high speed.
Step Two: Process
Once the as-built conditions of a building have been captured, the next step is to process the scan. This is a critical step as it includes the validation of the survey data. Once the scan has been processed it should also be post-registered with a manual check of the data to ensure any error or overlapping is avoided.
Step Three: BIM Modelling
This stage of the process is where the Point Cloud gets shaped into a digital platform. In order to be able to model the Point Cloud Scan, we need to follow several steps including:
- Verification
- Insertion
- File set-up
- Modelling
- Collaboration
Step Four: Quality Assurance
There are a few quality assurance processes that need to be followed to ensure the quality of the BIM model after modelling has taken place – including checking on any potential Mechanical, Electrical or Plumbing issues.
So, if you really want to understand the Scan to BIM process it is basically the process of creating a digital representation of the existing conditions of a building through the use of BIM. A laser scanner is used to capture an accurate 3D scan of the site, and this is then imported into 3D BIM software in order to create as-built models or capture the design with real-world conditions. The Scan to BIM process is carried out through four distinct steps: capture, process, BIM modelling and quality assurance.
Please do not hesitate to get in touch to find out more about The CAD Room’s Scan to BIM services.